
Do You Really Need Crimp Terminals? The Cost of Saving a Few Cents
“Do I actually need crimp terminals?” — the question usually has a specific situation behind it: the cabinet is already wired, there are a few spare positions on the terminal block, so why not just twist the remaining wire in? Or: there is no crimper on site, could we wrap it a couple of times with tape and call it done?
So this article skips selection detail and goes straight to three practical questions: what happens if you skip the crimp, where crimping genuinely beats the alternatives, and in which applications you can leave it out.
I. A real scenario: the cost of not crimping
Say you twist a 6 mm² copper conductor straight under a terminal block screw, with no terminal. What happens?
Short term: it works, and it even runs warm. The screw presses bare copper against a metal surface, conducting through friction. The contact area looks closed; a contact resistance measurement returns a few milliohms, which seems fine.
Medium term (months to a year): copper is soft, and the screw only clamps a small patch of it — the rest of the wire lies slack against the metal. Every thermal expansion cycle loosens the joint a little. The copper surface oxidises, and copper oxide has ten to forty times the resistance of pure copper. The contact resistance climbs from a few milliohms to tens of milliohms.
Consequence: that position on the terminal block starts running visibly hotter than its neighbours. A thermal image shows a bright spot. Push the current up a notch, or wait for summer —
the plastic of the terminal block softens and carbonises, the copper bar anneals, and the contact deteriorates further. This is a positive feedback loop: hotter oxidises more, more oxidation makes it hotter. The end state may be a tripped circuit, a burnt terminal block, smoke alarm activation, or a fire.
And the whole chain started with saving one terminal that cost a few cents.
II. What a crimp terminal really solves
Once the process above is clear, the purpose of the crimp terminal becomes obvious. It does not solve “can I make a connection” — it solves “will that connection stay stable forever”.
The core difference: a screw relies on friction, and friction decays; a cold weld relies on metallic bonding, and bonding does not decay.
Under crimp pressure, the copper strands and the barrel wall push into each other’s crystal lattice and form a gas-tight metallic whole. That bond does not depend on any maintained clamping force — it does not loosen because you stopped tightening the nut. The contact resistance is essentially fixed from the moment of crimping and does not creep upward with time and temperature.
This also explains a counterintuitive fact: a loose screw is far more dangerous than a well-made crimp, because the former degrades continuously while the latter is stable from the start.
III. Against the three alternatives
There are really four ways to “make an electrical connection”. Here they are side by side:
| Method | Contact resistance | Vibration resistance | Accidental contact | Speed | Verdict |
|---|---|---|---|---|---|
| Crimp terminal | Lowest (micro-ohm range) | Excellent | Yes, when pre-insulated | Fast | ✔ Standard for control circuits |
| Screw terminal (bare wire) | Milliohm range, and rising | Fair | None | Fast | △ Usable but needs regular tightening |
| Twist + tape | High and highly unstable | Poor | None | Slow | ✘ Not for any permanent circuit |
| Soldering | Low | Poor (thermal stress cracking) | None | Slow | △ Very fine wire, no vibration only |
On twist-and-tape
This one needs its own paragraph, because people really do it on site, usually because “there is no crimper here”.
A twisted connection has the worst contact resistance of any method, and its stability degrades quickly under vibration and time. Worse, in a twist the strands overlap each other, and every strand carries its own oxide film blocking the current — the real contact area is tiny.
If you must (a temporary lamp, some commissioning), at least follow these three rules:
- Twist the strands tight first — no visibly loose strands anywhere;
- Tin the connection — this “solders” the strands into one body and increases the contact area by an order of magnitude;
- Wrap with insulation tape in multiple layers and pull it tight, not one casual turn.
Even then, it is suitable only for temporary work, never for a long-term control or power circuit. Buying a ratchet crimper for the price of a few tens of your currency units is the best-value insurance policy available.
On soldering
A soldered joint does have low contact resistance, but it fails in a specific way over time: the solder joint, the copper conductor and the terminal all have different thermal expansion coefficients, and temperature cycling cracks the joint. Soldering also needs equipment and heat, and the heat can anneal and soften the terminal itself.
The automotive harness industry used soldered terminals decades ago and has largely moved to crimping, precisely because of vibration reliability. Soldering suits very fine wire in non-vibrating, very-low-resistance applications such as sensor signals — not general electrical connections.
IV. The cost arithmetic
Many decisions stall on money, so let us do the arithmetic.
| Option | Upfront cost | Long-term cost | Notes |
|---|---|---|---|
| Crimp terminal | Terminal $0.02–0.15 + ratchet crimper $12–50 (one-off tool, amortised over years) | Essentially zero | Joint life matches the conductor |
| Bare wire under a screw | $0 | Periodic inspection and re-tightening; eventually a burnt terminal block | Saves cents, buys long-term maintenance |
| Twist + tape | $0 (a few cents of tape) | Fault-finding, downtime, potential fire | The saving and the risk are not remotely comparable |
| Terminal block + crimp terminals | Block $0.40–2 per position + terminals | Fast localisation and replacement on failure | Paying for maintainability |
Run the numbers and it is clear: a ratchet crimper costs about the same as two fault-finding visits in travel and labour. A terminal block destroyed by one heating joint costs you the whole cabinet, the lost production and possibly customer compensation.
There is a second column to the ledger: how diagnosable the joint is. The state of a crimped joint is determinate — strands broken or not, fully seated or not, contact resistance measured. The state of a screwed joint is indeterminate: is this screw still tight? You can only find out by dismantling it or guessing with a thermal camera.
V. Where you genuinely do not need one
Having argued necessity at length, it is only fair to be clear about where it does not apply:
| Application | Why not | What to do instead |
|---|---|---|
| Temporary commissioning fly leads | Reworked constantly and removed anyway | Test leads with alligator clips |
| Inside luminaires, decor, small appliances | Low current, tight space, cost-sensitive | Riveted terminals or moulded-in harnesses |
| Very fine signal wire (<0.5 mm²) | Crimp terminals are uneconomic at this size | Soldering or dedicated micro terminals |
| High-current main circuits | Should not be used there at all | Copper lug (see the previous article) |
| High current disconnected frequently | A crimp cannot be undone | Screwed copper lug and bolt |
| Cabinets built entirely from pluggable connectors | No need to terminate to the base | Industrial connectors (MIL circular, rectangular) |
Note the last row: industrial connectors are a separate technology route in their own right. Where connections are plugged and unplugged regularly, or whole devices mate to each other, a locking industrial connector is the right answer. A crimp terminal is for a joint that does not change; it is not a mating interface.
VI. Three practical recommendations
If you are a project manager or an electrical engineer, three things from this article matter:
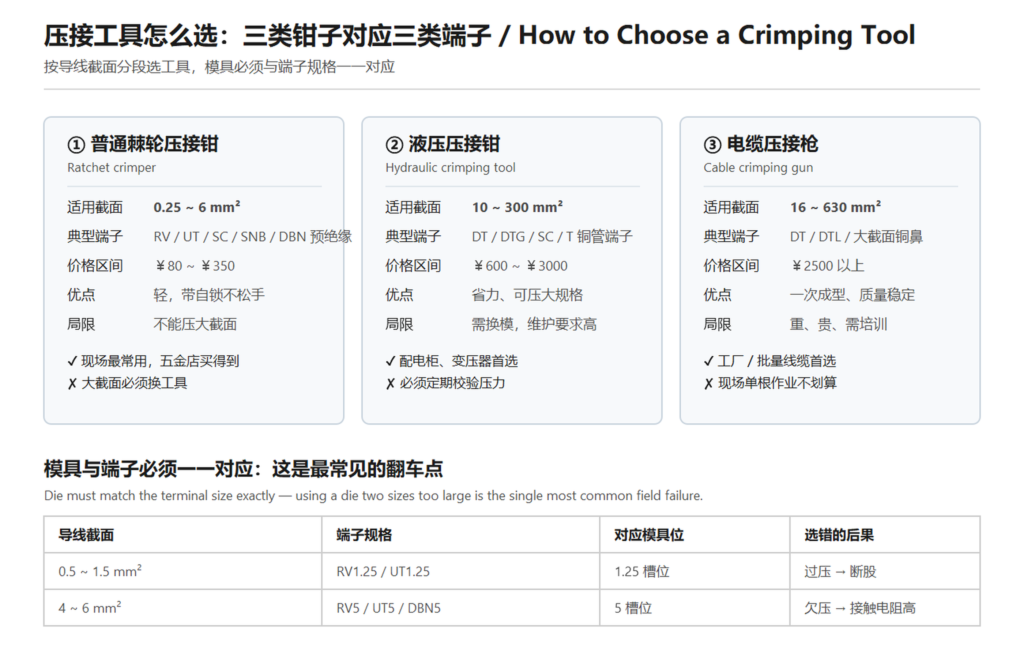
One: get the tool on site first. Every wiring crew needs at least one ratchet crimper with the common dies, covering up to 6 mm², plus a hydraulic crimper if the project needs it. This is not an optional extra — it is the precondition for being able to execute the standard process at all, exactly as a welder needs a torch.
Two: write “pull it” into the work instruction. No complex test equipment needed — pull the terminal and look for broken strands. Two seconds. Putting that single line on the standard work card is worth more than any amount of training.
Three: do not economise on the main circuit. Crimp terminals in control circuits are standard practice, and copper lugs in main circuits are standard practice. Leave both alone. The places where you can legitimately save money are decorative lighting and temporary fly leads — spend that budget on these two instead, and only then does it count as saving.
Wrapping up
So “do I need crimp terminals?” has an answer that depends on which circuit you are asking about.
In control circuits, signal circuits, and anything with frequent maintenance or vibration: yes, and they are the standard practice. Without them you are betting that the joint will not age, will not loosen, and will not be missed on some routine inspection — and the odds on that bet are not good.
In high-current main circuits: no, because they should never be there. Those applications need solid copper lugs.
What is genuinely worth worrying about is not “crimp terminals or not”, but “crimping it with ordinary pliers” and “twist and tape” — the two apparently thrifty shortcuts. They save a few cents and permanently bury a joint that may fail at any time into your equipment.
Related reading: the crimping procedure in How to Crimp a Cold-Press Terminal: The Five-Step Method; the difference from copper lugs in Crimp Terminal vs Copper Lug; materials and plating in What Are Crimp Terminals Made Of?